pixel art tutorial
Want to learn how I make my pixel art? Check out this mini tutorial! I use Adobe Photoshop for my pixel art, but any program which has a pencil tool and layer capabilities should be good for this. This is only a walkthrough of how I personally work, but everyone has different methods and styles so try lots of things to develop your own. Leave me a comment in the shoutbox if you found it helpful!step 1
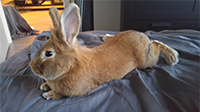
First, get your reference picture for what you want to pixel. I’m using my bunny Panda for this tutorial.
step 2
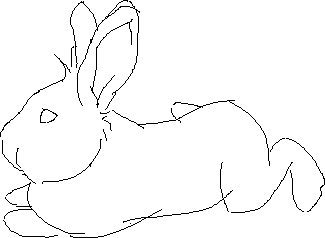
Sketch a rough outline of your subject. For pixel art, you will generally want to simplify and exaggerate most features, so here I have squished his shape a bit and laid him out more horizontally instead of on an angle like in the photo. Sometimes I even trace at this stage- no shame!
step 3
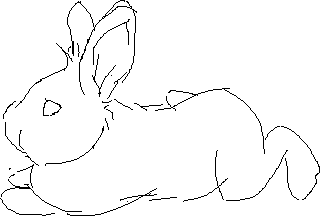
Keep refining your sketch to your preferences. My style is more cutesy, so I squish him in even more and enlarge the eye and widen the ears.
step 4

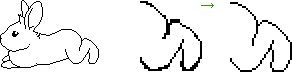
When you’re happy with the sketch, minimize it to the size you want. Pixel art is usually small, so I’ve reduced this one to about 100 pixels wide. I’ve also lowered the opacity so that I can do my lines over top (make a new layer in your art program).
step 5

Draw rough lines over top of the reduced sketch. I got rid of the back leggy because it looked weird.
step 6
This is the fun part! Now you will clean up your lines. Cleaning up means erasing those ugly double lines so that your lines look smooth and not jagged.
step 7

Now we pick our colour scheme! I am not the greatest at this so I just wing it. Sometimes I use the eyedropper tool and directly pick from the image and then I increase the saturation of all the colours I pick. That gives it that nice, cartoony, look I like. Anyways, even when I do this, I still constantly change the colours as I go based on how I feel.
step 8

Here I have done some more tweaking of the lines to further cutify my pixel bunny. I’ve shortened the snout and rounded out the chin area. Also, I’ve coloured in the outside lines in my darkest colour (the dark brown) and coloured the lines inside the body a lighter brown. This gives a really satisfying effect!
step 9

Woo! The funnest part - colouring! Pandy’s really coming together now! See what a difference those inside lines make?
step 10

Now for the worst part - shading. Pixel art generally uses reduced palettes, and you have to get creative with shading sometimes. I’ve shaded in my dark areas with that medium-brown colour, then gone in and “erased” out some short lines into it. IDK how to really explain this, but I think this effect is called “dithering”. It basically gives the illusion of another colour and also helps add texture. I’ve also added some fluff to my dear Pandy to better capture his essence.
All done! You can definitely add highlights too, but I chose not to for this tutorial because the shading crushed my spirit...
resizing tips

You can use these techniques at any size, but you’ll, have to tweak them as you get smaller.
For example, for the middle bun (reduced to 50%) I did the shading in more of a blocky way because detail at this size gets lost. There is still some of that dithered shading but not as much as in the bigger one. I’ve also added a tail c:
For the smallest one (reduced by 50% again), I had to play with the front paws a bit to give them definition. And the eye takes up like 90% of his head now but it looks cute so we roll with it. Also that back leg was REALLY REALY hard to do right at this size but I think I managed.
You will notice when going down in size, you will use your artistic liberty a lot more, and you’ll have to problem solve by exaggerating certain things or modifying them so you don’t lose the essence of what you’re drawing.
...and last but not least, you can animate your smol fluf. maybe some day I will make a tutorial about this process but it's very tedious.

"giiiiiiiirl"